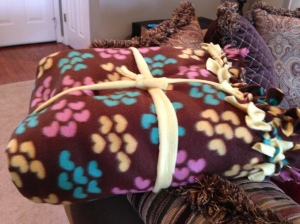
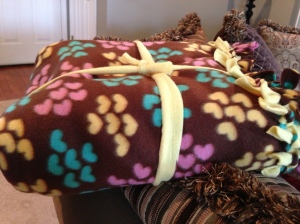
Have you ever felt the need to make a 10 foot by 10 foot fleece quilt? No? Well ME EITHER. Let me just tell you how this all went down.
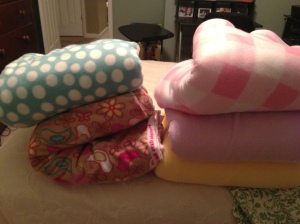
One perfectly normal day, my boss and I were having a normal conversation. I started to complain about how it seems to be MORE expensive to make a homemade gift then it is just to buy one. I mentioned the no-sew fleece blankets that I like to make and how it costs about $25 in fabric, and a hour and a half of time to make. Well HE then mentioned that his wife has about three or four of those, but always complains that it is just much too small. I could then see a lightbulb go off in his head; really, there could’ve been a lightbulb right over his head – it was that obvious. He decided, that as part of her Christmas present, he wanted ME to make her a 10 foot by 10 foot no-sew blanket. I kind of chuckled at him, and went about my work…but then he said, for real, how much do you want? This point, my broke college kid butt began to listen…I tried to tell him that fabric only comes so wide – the only thing you can do is make it longer. But, like a hard headed man, he said he didn’t believe that. We did research online, called warehouses, called our local fabric store and they all confirmed my thoughts – you can’t even special order a 10 x 10 foot piece of fleece fabric. So, we did a little googling and got the idea to make a no-sew fleece quilt…we then came up with a drawing for a fleece quilt. Being the mathe matically incapable people that we are, we could not figure out how many yards of the 5 different fabrics we would need to make this ridiculous quilt. We took the drawing to the fabric store, and asked pretty much everyone in the store how many yards we would need to buy of five different fabrics, to make this ridiculous blanket. One lady, happened to be a quilter and helped us figure out the measurements. She then looked at him like he was crazy and said “you do realize, when your wife says she wants a huge blanket, she doesn’t mean THIS huge?” He smiled, and then we proceeded to pick out the five patterns. We decided on an almost 10×10 foot blanket, with 29×29 inch squares and three inches cut out for the knots. We bought five fabrics, with 5 yards of each fabric.
5 yards of fabric, 50 29×29 inch squares, 200 3×3 squares, 25 slits, 5,000 knots, and about 20 hours later – this monstrosity of a project is done.
Now, once again – have you ever wanted to make a 10 foot by 10 foot no sew fleece quilt? Has anyone ever asked you to do this? If you ever feel the need to make one, go have a cup of coffee and pat yourself on the back and say “it will be okay, they won’t admit to the insane asylum” or if anyone ever asks you to do this, RUN, RUN, RUN, as fast as you humanely possibly can. Now, if you aren’t smart enough to do either of those, here is a how-to on how to make a 10×10 foot no-sew fleece blanket OR you could be smart and change these measurements, and make a much smaller, more manageable blanket.
You will need:
Fabric
Good scissors
Measuring tape
a lot of space
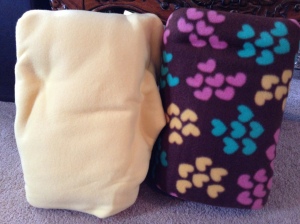
1. Decide what size you want to make your blanket, and do the calculations necessary to find out how many yards of fabric that you will need. You can use as many different fabrics as you want, and you can make this blanket any size that you could possibly want. Decide if you want the front and back to be the same pattern, or if you wanted different patterns. It would be considerably cheaper to make one side patterned, and the other side solid colors (because solids tend to be less expensive). For our case, I used 5 different fabrics and I needed 5 yards of each (for front and back), the patterns were 50% off and almost the same price as the solids when we went to Jo-Ann’s.
2. Take one piece of fabric at a time, and cut the squares out to your desired size. Remember, that when deciding on the size of your square, take into account that you have to cut three inches off from each side when cutting the slits.
 3. Use that square that you first cut, as a marker for the rest of the fabrics because it is much easier to just cut around a piece of fabric instead of measuring it out every time.
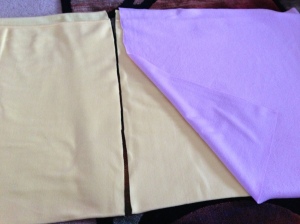
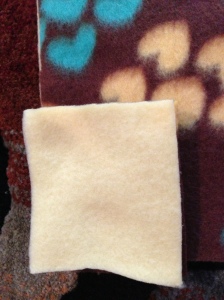
4. Once you’ve cut out all of the pieces, this is a good time to ensure that all of your pieces are face up. I would’ve never known that there is a top side and bottom side to a piece of fabric, if someone had not told me. So in order to save yourself from headache later, take the time now to make sure that all of your pieces are facing the same direction in your pile
 There is always a slight difference in the color of the front and back, and the back is normally a little fuzzier.

5. Now cut a 3×3 inch square out of each corner of every fabric. I doubled up the fabric (and sometimes tripled) to make this go a lot faster for the rest of the time I was cutting. A good pair of scissors can cut up to three pieces of fabric.
 6. Now, use that 3×3 square as a marker for the rest of your cutting.


7. Now, decide how many slits you want on each side of the fabric. This part is VERY important. Each side of every single fabric, has to have the same amount of slits or this will not work! It is much simpler with a plain no-sew blanket because you put a piece of material ontop of another piece of material, and cut the slits (the two pieces are cut together). But, at this point, you have no idea what piece of fabric will be connected with what piece of fabric – cut each side the same amount. I started with trying to cut them at one inch intervals, but I won’t lie – I’m human, and each of my pieces were not exactly the same size. They are all 3-4 inches off of each other, but that’s the great thing about fleece – it is a very forgiving fabric, it will pull and tug to the direction that you want it to go. I cut 25 slits on each side, and some of them were really small slits and some of them were really big slits…but it is ok! I promise.

My dad cut this piece of something or another (I really don’t know what the material was) and I originally planned on using it as a guide for one inch intervals, but I just used it to help hold down the fabric while I was cutting.
8. After all the knots are cut, decide on what pattern you want to do for your blanket. I made a drawing of two different patterns and sent it to my boss to let him decide and he chose one pattern for front and back. You could easily make two different patterns of your fabric on the back, and that would look really neat.
 Here is my horrible, very rough drawing. But, it really came in handy while making the blanket. I referred back to it each time I made a piece.
9. I made each row first and then combined each row together. It is much easier to do it this way while working with a huge blanket, because I didn’t really have enough room to piece this thing together…we had to move the furniture in the living room so I could finish it.
 Here is the first row, I then just continued to add them together.
Trick for tying the knots:
You are going to make two knots, and the key to make it where the other fabric is pulled to the opposing fabric is to tie one knot vertically and then one horizontally. This is really hard to explain but here are two pictures.
First knot:
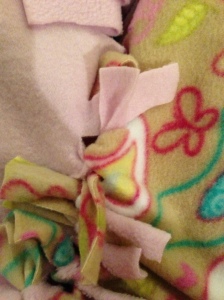
Second knot:

From there, you just piece each piece together. I pieced the front side together first. And then I made each row for the second side, and connected that to the front piece as I went along. Make sure when you piece the back side to the front side, that the front side is facing down (where you can’t see any of the ties).


 Now, I don’t intend on ever making a 10 foot by 10 foot no sew fleece quilt again, but I am really happy that I took on this challenge. I had absolutely no idea that I could do this. I didn’t have any instructions to follow, and it was just all pretty much from my mind. I’ve had finals this week, and I couldn’t wait to get them over with so I could work on this project, because I was so worried I would mess it up. I WILL use this knowledge to make a much smaller, quilt next time.
– Thanks for reading! If you enjoyed my post, please like my Facebook page, subscribe, and/or pin this to Pinterest, so you can continue reading! –
 I hope everyone had a great Christmas, and I can personally tell you that I’m super sad to see it go. I don’t like it when the holiday season is over, and I will miss telling everyone I see “Merry Christmas!” But, if I’m looking on the bright side – one good thing that I can now do, is share with everyone this really cute, easy bobby pin that I made for a friend and my sister.
 1. This first step can be different everytime, depending on what look you want to go for. I made some pins with just one button, and then some of them I double or tripled up the buttons. But, your first step will be to thread your ribbon through your button(s). When you thread the ribbon through, make sure that your ribbon comes out almost equal on both sides.

 4. Cut the ends off of the ribbon, so they won’t be showing.
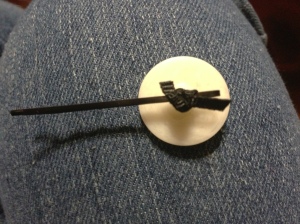 5. Finish steps 1-4 until you’ve completed all of the Button Bobby Pins you would like.
 7. Allow to cool completely.